Discover The Process

All About the Keeping of Bees
Beekeeping has evolved a lot over the years.
When my dad kept bees in the 80’s, Jordan Lake was still filling, and our closest neighbor was a half-mile down the road. We were surrounded by tobacco fields and farmland. In NC, Tracheal mites were discovered in 1984 and six years later, Varroa entered the picture. Before that, it seemed the biggest problem was keeping enough supers on the hive to keep up with honey production.
Today, we have neighbors within a ¼ mile and all the tobacco fields and local farms have diminished and housing developments have sprouted in their place. Less and less acreage is available for foraging nectar and pollen. While tracheal mites are a rare occurrence, varroa are a never-ending battle when it comes to keeping bees.
Record keeping is a must. With an ebb and flow of around 15 hives, it seems there is always something to do. In the Spring, as we gear up for the nectar flow, I begin splitting hives, installing new hygienics, doing inspections and taking mite counts. This way, I am able to know what’s next on the agenda.
Continuing education is essential. In the early Spring, I attend the 3-day North Carolina Beekeepers Association Conference where Master Beekeepers, experts & researchers share their knowledge and experiences. I return with a strong plan of action and hit the ground running, inspired with a plan of action for the next season.
And so begins the routine, every 7 days in the Spring & every 2 weeks in the Summer/Fall I inspect every hive. Mite counts are done every 3-4 weeks in an attempt to stay ahead of the game.
By June, I pull the honey supers off and begin processing. In addition, this is also the time of year when varroa numbers are ramping up & IPM is imperative. This is what is referred to as “the busy season” amongst beekeepers.
As things begin to wrap up for the summer, and I’m about to catch my breath, the NCSBA Fall Conference is held. This is another opportunity to gather with fellow beekeepers and share our experiences, findings and honey. Sweet comradery!
Upon return, I begin assessing and combining the weaker colonies into the stronger and condense hives to prepare for the winter. Usually, I tuck the girls in for the Winter in late November to mid-December.
During the “down time”, I clean, repair, paint, make frames & hive bodies for the Spring.
Typically, in January, we’ll see a 70 degree day. I’ll take that opportunity to peek in and verify they have enough food to make it through and close them up until early Spring.
And thus, the cycle begins all over!
It’s a lot of hard work and it’s not an inexpensive endeavor, but it is so very rewarding.

How to Extract Honey
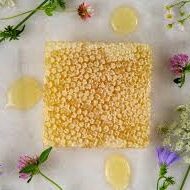
The brood box contains the queen, her eggs, larva & brood, along with honey frames. This box is not used for any other purpose than brood production. The honey supers – known as “supers” sit atop the brood box and are strictly for honey and wax production.
Step 1:
Remove only fully/mostly capped honey frames. All other frames are left for the bees to store for winter.
Step 2:
Remove the bees. These frames are protected and full of bees. Using a smoker & bee brush while lightly brushing them away, does the trick.
Once all the capped frames have been removed, they are taken to our honey house where the hard work begins.
Step 3:
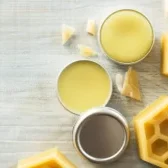
Using a heated knife to cut off the wax capping to expose the honey underneath. Those cappings go into a capping tank where they are left to ‘rest’. Later, they will be melted down in the solar melter and impurities strained out. This is where I get most of the wax used in the cosmetics.
Step 4:
Into the extractor it goes! (Or, as my husband likes to call it, ‘the centrifuge’) My extractor holds 12 frames. I slowly begin the spinning process and allow it to run about 5 minutes.
Step 5:
Once extracted, those frames are returned to the hive and the bees are allowed to glean the remaining honey.
Step 6:
The extracted honey is then released through a honey gate at the base of the extractor where it is allowed to rest for about a week in 5-gallon buckets.
The following week, the bottling process begins.
Resting allows impurities to float to the top. The bucket also has a honey gate at the base, and it is opened and closed as each bottle is filled. Once the bucket is almost empty, I place another bucket beneath with a stainless-steel strainer to catch the particles floating on top from the resting period. Then the honey that separates is bottled for our family.
Thus is said, “unfiltered & unrefined” honey.

Products of the Hive


FREE LOCAL DELIVERY - Apex, Cary, Holly Springs